E-Signature Component
CraftMyPDF integrates with Documenso to provide enterprise-grade electronic signatures that comply with the ESIGN Act, UETA, and eIDAS (SES).
When E-Signature is enabled on a PDF template, CraftMyPDF automatically creates a Documenso envelope after each PDF generation, assigns your configured fields to the specified recipients, and sends signing requests by email.
How It Works
- Design - Enable E-Signature on a PDF template, configure signing order, envelope details, expiration, and recipients, then place E-Signature fields on the page.
- Generate - Generate a PDF through the API, Merge API, or dashboard. CraftMyPDF renders the PDF and queues a Documenso envelope for processing.
- Sign - Recipients receive an email with a unique signing link and complete their assigned actions (sign, approve, view, or assist).
- Track - Monitor document status and download completed PDFs from the Signed Documents page in your dashboard.
E-Signature is available only for PDF templates. It is not available in Preview mode.
Step-by-Step Tutorial
For a complete walkthrough, follow the step-by-step tutorial on adding e-signatures to PDFs and automating signing with CraftMyPDF.
The tutorial shows how to import a PDF contract, connect JSON data, configure two signers, place E-Signature fields, and send signing requests automatically.
Configure E-Signature
Open your PDF template in the designer and select the E-Signature tab in the settings panel. The tab is organized into four sections that match the topics below: signing order, envelope details, envelope expiration, and recipients.
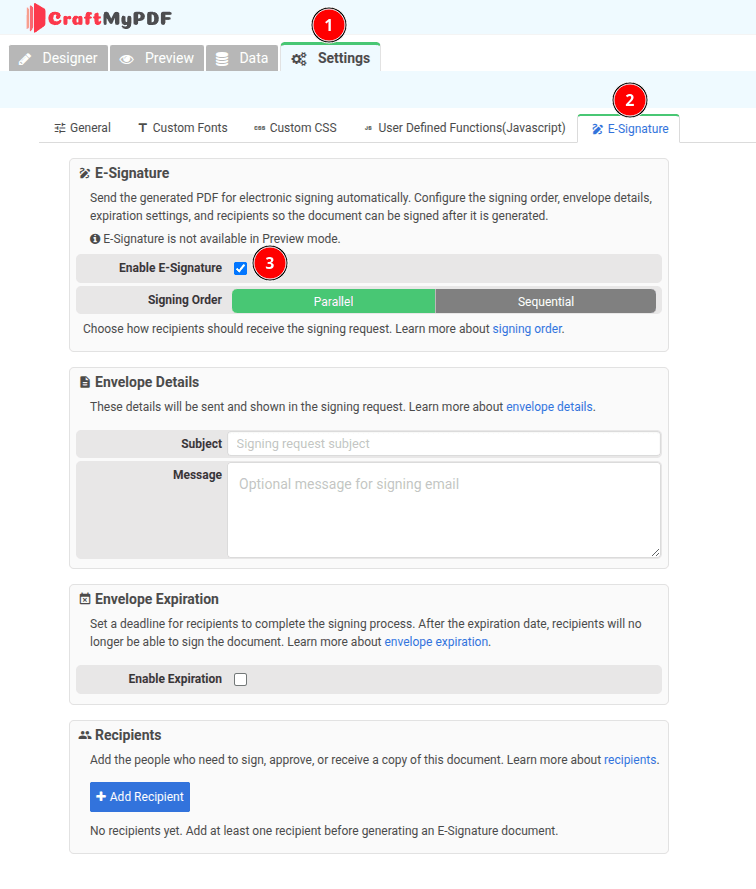
To enable E-Signature for your template, check Enable E-Signature.
When enabled, CraftMyPDF creates a Documenso envelope after PDF generation and assigns the configured fields to the recipients below.
Signing Order
By default, all recipients receive the document at the same time and can complete their actions in any order (parallel signing). You can change this to require recipients to act in a specific sequence.
- Parallel
- Sequential
All recipients receive the document simultaneously. The document is completed when everyone finishes their required actions. Use this when:
- The order does not matter
- You want the fastest completion time
- Recipients are independent of each other
Sequential signing is required to use the Assistant role. Assistants must act before the signers whose fields they pre-fill.
Recipients receive the document one at a time, in the order you specify. Each recipient must complete their action before the next recipient is notified.
To enable sequential signing:
- Choose the Sequential option
- Assign an order number to each recipient. Recipients with the same order number can act simultaneously
- The document proceeds to the next order number only when all recipients at the current level have completed their actions
Example workflow:
| Order | Recipient | Role |
|---|---|---|
| 1 | Admin Assistant | Assistant |
| 2 | Department Head | Approver |
| 3 | Contract Party A | Signer |
| 3 | Contract Party B | Signer |
| 4 | Legal Team | CC |
In this example:
- The assistant pre-fills information
- The department head reviews and approves
- Both contract parties sign at the same time
- Legal receives a copy after completion
Envelope Details
Optionally customize the email subject and message that recipients receive. These values are sent to Documenso as envelope metadata.

Subject (Optional)
Customize the email subject line. If left blank, Documenso generates a default subject based on the recipient's role:
- Signers: CraftMyPDF invited you to sign a document
- Approvers: CraftMyPDF invited you to approve a document
- Viewers: CraftMyPDF invited you to view a document
- Assistants: CraftMyPDF invited you to assist a document
Message (Optional)
Add a custom message that appears in the email body. You can use these variables:
{signer.name}- Recipient's name{signer.email}- Recipient's email{document.name}- Document title
If left blank, a default message is generated based on the recipient's role.
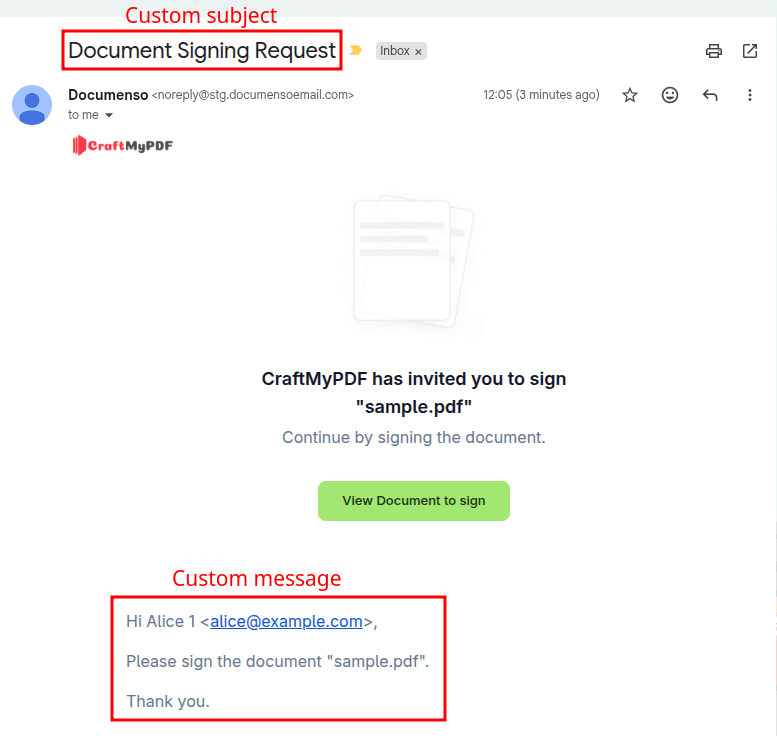
See also the What Recipients Receive section.
Envelope Expiration
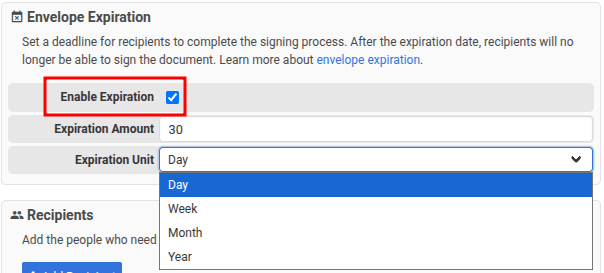
Optionally set a signing deadline so recipient links expire after a configurable period.
By default, envelope expiration is disabled, and signing links remain valid until the document is completed, rejected, or cancelled.
To enable expiration:
- Check Enable expiration
- Set the Expiration Amount and Expiration Unit (day, week, month, or year)
When enabled, the default expiration is 30 days. Recipients must complete their actions before the deadline, or their signing link expires.
Recipients
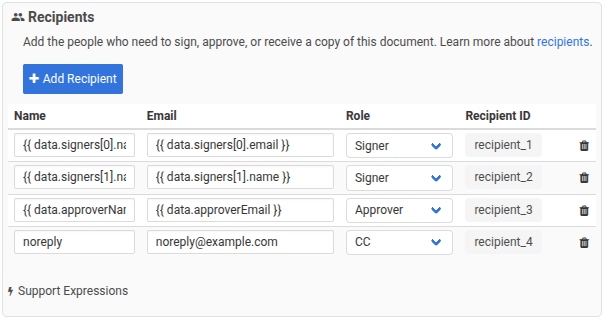
Add one or more recipients who will receive the document. Each recipient is assigned a unique Recipient ID (for example, recipient_1). Use this ID when assigning E-Signature fields on the template.
Recipient name and email fields support both static values and expressions. For example, given the following JSON data:
{
  "signers": [
    {
      "name": "Signer 1",
      "email": "signer1@example.com"
    },
    {
      "name": "Signer 2",
      "email": "signer2@example.com"
    }
  ],
  "approverName": "Approver",
  "approverEmail": "approver@example.com"
}
| Expression | Evaluates to |
|---|---|
{{ data.signers[0].name }} | Signer 1 |
{{ data.signers[0].email }} | signer1@example.com |
{{ data.signers[1].name }} | Signer 2 |
{{ data.signers[1].email }} | signer2@example.com |
{{ data.approverName }} | Approver |
{{ data.approverEmail }} | approver@example.com |
Role Overview
| Role | Action Required | Can Sign | Description |
|---|---|---|---|
| Signer | Yes | Yes | Must sign the document |
| Approver | Yes | Optional | Must approve the document |
| Viewer | Yes | No | Must view the document |
| CC | No | No | Receives a copy after completion |
| Assistant | Yes | No | Can pre-fill fields for other recipients |
Role Details
- Signer
- Approver
- Viewer
- CC
- Assistant
Each signer must have at least one Signature field assigned to them.
Signers are the primary recipients of a document. They must complete all signature fields assigned to them before the document can be finalized.
What they can do:
- Sign signature fields assigned to them
- Fill out any other fields assigned to them (text, date, checkbox, and so on)
- Download the document after signing
What they cannot do:
- Sign on behalf of other recipients
- Modify fields assigned to other recipients
When to use this role:
- Contracts requiring a legally binding signature
- Agreements where the recipient must formally consent
- Any document that requires a signature to be valid
Approvers must review and approve the document, but signing is optional. The document cannot be completed until all approvers have given their approval.
What they can do:
- Approve or reject the document
- Optionally add a signature if signature fields are assigned
- Fill out fields assigned to them
- Download the document after approval
What they cannot do:
- Complete the document without explicitly approving it
- Modify fields assigned to other recipients
When to use this role:
- Documents requiring manager or supervisor approval
- Workflows where review is required before final signatures
- Compliance processes requiring sign-off from multiple parties
Viewers must acknowledge that they have viewed the document. They cannot add signatures but must confirm they have reviewed the content.
What they can do:
- View the complete document
- Confirm they have viewed it
- Download the document after viewing
What they cannot do:
- Sign the document
- Fill out fields (no fields can be assigned to viewers)
- Modify the document in any way
When to use this role:
- Informational documents that require acknowledgment
- Policies or disclosures that recipients must review
- Documents where you need proof of receipt without a signature
CC recipients receive a copy of the completed document but do not need to take any action. They are notified when the document is fully signed.
What they can do:
- Receive a copy of the completed document
- Download the signed document
What they cannot do:
- Sign or approve the document
- View the document before it is completed
- Take any action that affects document completion
When to use this role:
- Keeping stakeholders informed about signed agreements
- Sending copies to legal or compliance teams
- Archiving completed documents with relevant parties
The Assistant role requires sequential signing to be enabled. You cannot use this role when recipients sign in parallel.
Assistants can prepare the document by pre-filling fields on behalf of other signers. This role is only available when sequential signing is enabled.
What they can do:
- Pre-fill suggested values in fields assigned to later signers
- Help prepare the document for the actual signers
- Fill out any fields specifically assigned to them
What they cannot do:
- Sign on behalf of other recipients
- Submit the document as complete
- Be used in parallel signing mode
When to use this role:
- Administrative staff preparing documents for executives to sign
- Workflows where one person gathers information and another signs
- Situations where you want to reduce the burden on the final signer
Placing E-Signature Fields
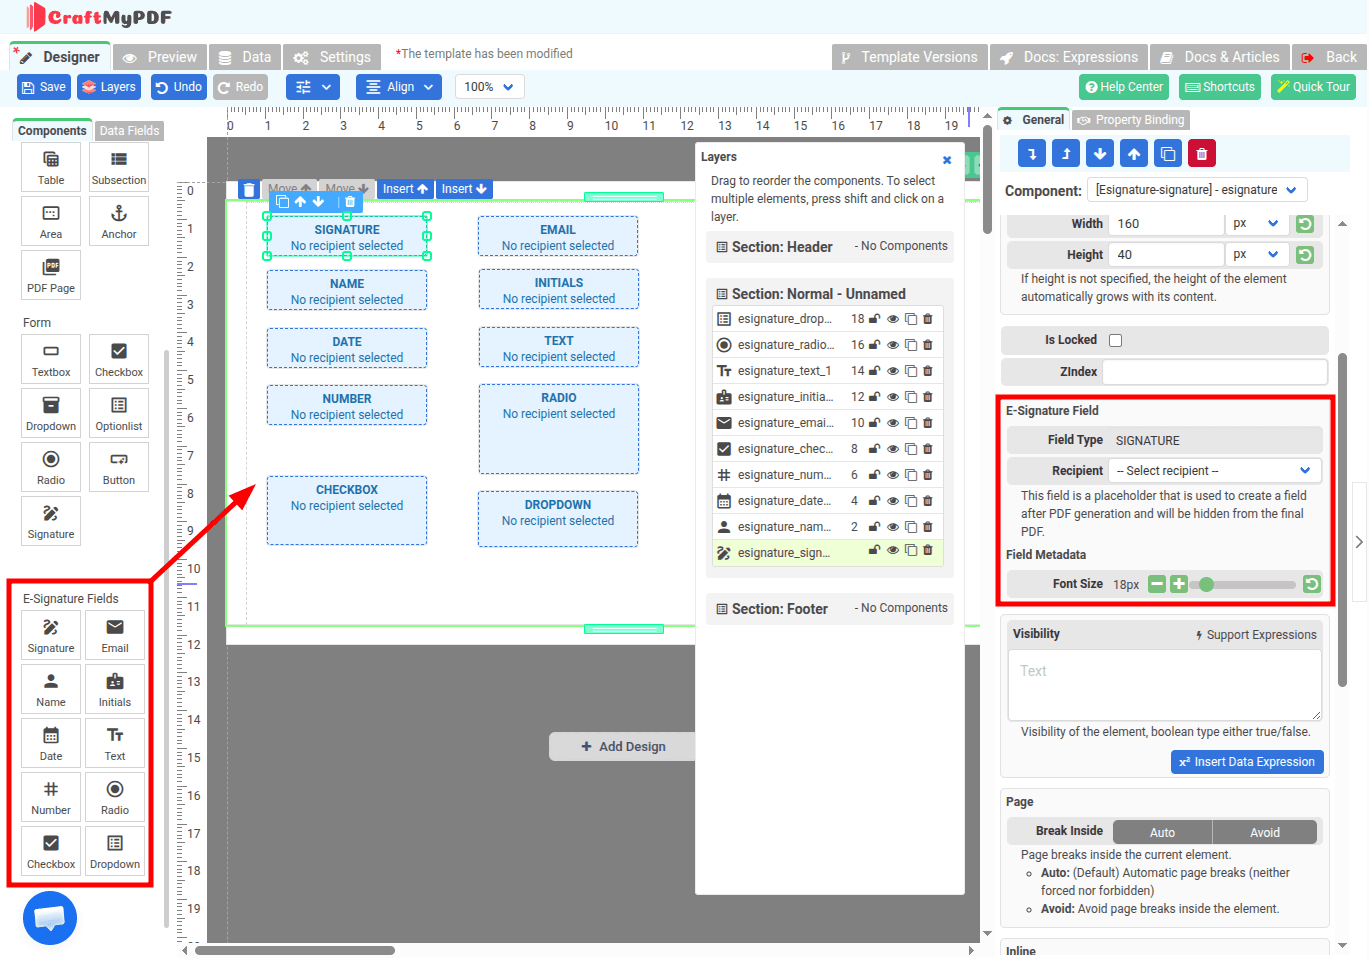
After configuring recipients, drag E-Signature field components from the Components panel onto your template. Ten field types are available under E-Signature Fields:
Signature, Email, Name, Initials, Date, Text, Number, Radio, Checkbox, and Dropdown.
For each field:
- Select the field on the canvas
- In the property panel, choose the Recipient that should complete the field
- Configure field-specific options as needed
Every E-Signature field must be assigned to a recipient.
| Field Type | Description | Auto-filled |
|---|---|---|
| Signature | Recipient's signature (drawn, typed, or uploaded) | No |
| Initials | Recipient's initials | No |
| Recipient's email address | Yes | |
| Name | Recipient's full name | Yes |
| Date | Date the field was completed | Yes |
| Text | Free-form text input | No |
| Number | Numeric input with optional validation | No |
| Radio | Single selection from a list of options | No |
| Checkbox | Multiple selections from a list of options | No |
| Dropdown | Single selection from a dropdown menu | No |
Signature
Each signer must have at least one Signature field assigned to them.
The signature field captures the recipient's legally binding signature. Recipients can:
- Draw their signature using a mouse or touchscreen
- Type their name and select a font style
- Upload an image of their signature
Configuration Options

| Option | Description | Default |
|---|---|---|
| Font size | Size of the text in the field (8-96px) | 18px |
Initials
The initials field captures abbreviated signatures, typically used to acknowledge individual pages or clauses.
Configuration Options

| Option | Description | Default |
|---|---|---|
| Font size | Size of the text in the field (8-96px) | 12px |
| Text align | Left, center, or right alignment | Left |
Email
The email field displays the recipient's email address. This field is automatically populated with the email address used to send the signing request.
Configuration Options

| Option | Description | Default |
|---|---|---|
| Font size | Size of the text in the field (8-96px) | 12px |
| Text align | Left, center, or right alignment | Left |
Name
The name field captures the recipient's full name. When the recipient has a name on file, the field can be auto-populated.
Configuration Options

| Option | Description | Default |
|---|---|---|
| Font size | Size of the text in the field (8-96px) | 12px |
| Text align | Left, center, or right alignment | Left |
Date
The date field records when the recipient completed the field or signed the document. By default, it auto-fills with the current date.
Configuration Options

| Option | Description | Default |
|---|---|---|
| Font size | Size of the text in the field (8-96px) | 12px |
| Text align | Left, center, or right alignment | Left |
Text
The text field accepts free-form text input from recipients. Use this for any information that does not fit other field types.
Configuration Options
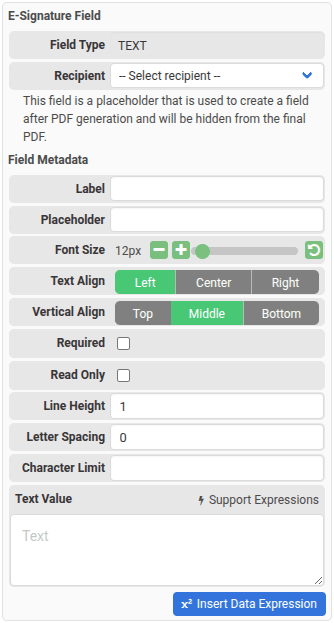
| Option | Description | Default |
|---|---|---|
| Label | Display text shown above the field | None |
| Placeholder | Hint text shown when the field is empty | None |
| Font size | Size of the text in the field (8-96px) | 12px |
| Text align | Left, center, or right alignment | Left |
| Vertical align | Vertical alignment of the text | Middle |
| Required | Whether the field must be completed | false |
| Read-only | Lock the field with a pre-filled value | false |
| Line height | Spacing between lines of text | 1 |
| Letter spacing | Spacing between characters | 0 |
| Character limit | Maximum number of characters allowed | None |
| Default value | Pre-filled text that recipients can modify | None |
Rules
- A field cannot be both required and read-only at the same time
- A read-only field must have a default text value (it cannot be empty)
- If a default text value is set, the field is inserted into the document automatically
- The text entered cannot exceed the character limit
- Recipients cannot modify a read-only field
Number
The number field accepts numeric input with optional validation constraints.
Configuration Options
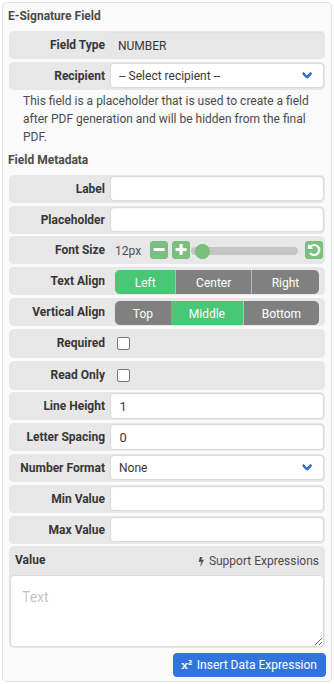
| Option | Description | Default |
|---|---|---|
| Label | Display text shown above the field | None |
| Placeholder | Hint text shown when the field is empty | None |
| Font size | Size of the text in the field (8-96px) | 12px |
| Text align | Left, center, or right alignment | Left |
| Vertical align | Vertical alignment of the text | Middle |
| Required | Whether the field must be completed | false |
| Read-only | Lock the field with a pre-filled value | false |
| Line height | Spacing between lines of text | 1 |
| Letter spacing | Spacing between characters | 0 |
| Number format | Display format for the number | None |
| Min value | Lowest allowed number | None |
| Max value | Highest allowed number | None |
| Default value | Pre-filled number that recipients can modify | None |
Rules
- The value must be a number
- A field cannot be both required and read-only at the same time
- A read-only field must have a default number value
- If both a default number and a maximum value are set, the default must be less than the maximum
- If both a default number and a minimum value are set, the default must be greater than the minimum
- The value must match the number format if one is set
Radio
The radio field presents a list of options where the recipient can select exactly one.
Configuration Options

| Option | Description | Default |
|---|---|---|
| Font size | Size of the text in the field (8-96px) | 12px |
| Required | Whether a selection must be made | false |
| Read-only | Lock the field with a pre-selected value | false |
| Direction | Vertical or horizontal layout | Vertical |
| Options | List of selectable values |
Rules
- A field cannot be both required and read-only at the same time
- A read-only field must have at least one option
- If a default value is set, the field is automatically marked as complete
- Recipients cannot select a value that is not in the options list
- Only one option can be selected at a time
Checkbox
The checkbox field presents a list of options where the recipient can select multiple items.
Configuration Options
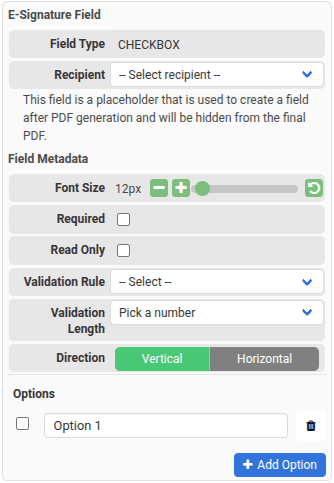
| Option | Description | Default |
|---|---|---|
| Font size | Size of the text in the field (8-96px) | 12px |
| Required | Whether at least one selection must be made | false |
| Read-only | Lock the field with pre-selected values | false |
| Validation rule | Rules for minimum/maximum selections | None |
| Direction | Vertical or horizontal layout | Vertical |
| Options | List of selectable values |
Rules
- A field cannot be both required and read-only at the same time
- A read-only field must have at least one checked option
- If default values are set, the field is automatically marked as complete
- The validation rule enforces selection counts: "At least", "At most", or "Exactly" a specified number of options
- Recipients cannot select a value that is not in the options list
Dropdown
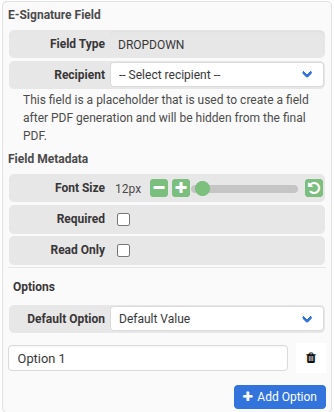
The dropdown field presents a list of options in a collapsible menu. Recipients select one option from the list.
Configuration Options
| Option | Description | Default |
|---|---|---|
| Font size | Size of the text in the field (8-96px) | 12px |
| Required | Whether a selection must be made | false |
| Read-only | Lock the field with a pre-selected value | false |
| Default value | Pre-selected option | |
| Options | List of selectable values |
Rules
- A field cannot be both required and read-only at the same time
- A read-only field must have a default value
- The default value must be one of the options
- If a default value is set, the field is automatically marked as complete
- Recipients cannot select a value that is not in the options list
What Recipients Receive
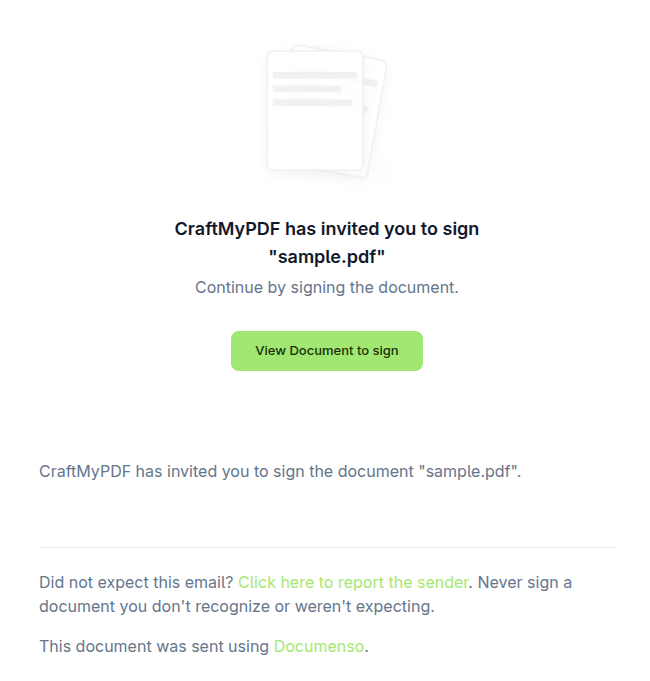
When a document is generated and sent, each recipient receives an email with:
- The document title (from your custom subject or the default for their role)
- Your custom message (or a default message)
- A button to open and complete their assigned actions
The email includes a unique signing link for that recipient. The link expires when the document is completed, rejected, cancelled, or when the envelope expiration deadline is reached (if configured).
Document Lifecycle
A document progresses through the following states:
| State | Description |
|---|---|
| Queued | The document is waiting to be processed |
| Processing | The document is being sent to Documenso |
| Created | The envelope was created but has not yet been sent to recipients |
| Sent | The document has been sent and is awaiting recipient actions |
| Completed | All recipients have completed their required actions |
| Rejected | A recipient rejected the document |
| Failed | Processing failed. Common causes include invalid template configuration and validation errors. Contact support if you need help. |
| Cancelled | The document was permanently deleted from Documenso. Contact customer support to request cancellation. |
Manage Signed Documents
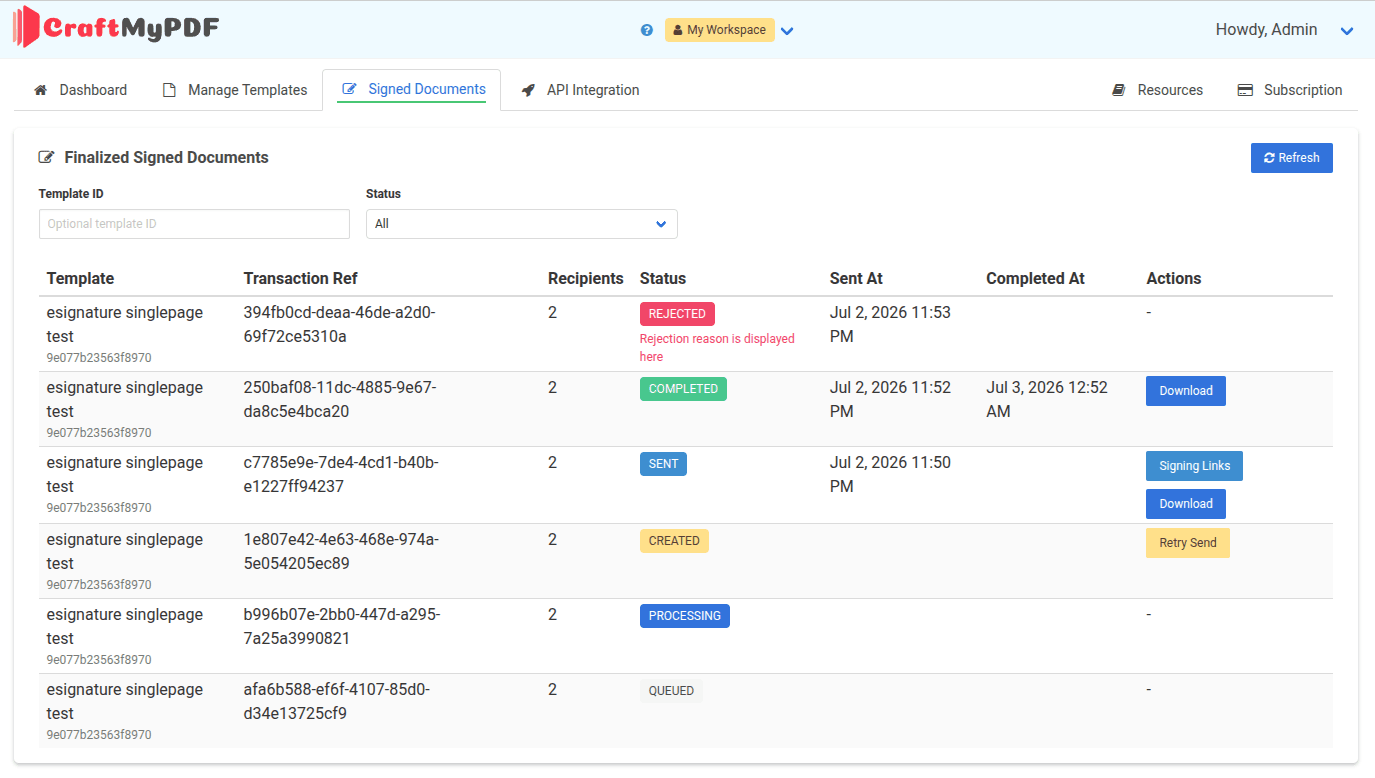
Open Signed Documents from your dashboard (next to Manage Templates) to view all E-Signature documents generated from your templates.
The table shows each document's template, transaction reference, recipient count, status, and timestamps. Filter by template ID or status to find specific documents.
Available actions depend on the document status:
| Action | Description |
|---|---|
| Retry Send | Resend a document that was created but failed to distribute to recipients |
| Signing Links | View and copy individual signing URLs for each recipient |
| Download | Download the signed PDF (available for sent and completed documents) |